A Beginner’s Guide to WordPress
What is WordPress?
WordPress is a free, open-source content management system (CMS) that is built with PHP. It’s the most widely-used CMS, powering over 40% of all websites on the internet. WordPress comes with a library of thousands of free themes, and there are also thousands of premium themes available for purchase. A website’s theme not only alters the design and style of a website, but it can also alter the user interface (UI) and user experience (UX) of the admin side as well. This can drastically affect how easy or difficult it is to make changes on a site.
Graphcom’s number one choice for WordPress theme is Divi, which is a premium drag-and-drop theme from Elegant Themes. Divi is now also the most popular and widely-used theme on all WordPress websites, with over 1 million users worldwide.
Keep reading to get a high-level overview of some of the basic functions of WordPress.
WordPress Essentials
WordPress Admin and Where to Find It
- The WordPress admin is like the “back door” into a website. Typically, you find the WordPress admin by going to domain.com/wp-admin, but sometimes the admin “slug” (the part of the URL that comes after .com) can be different. This is usually done for security reasons—there are a variety of plugins you can download that will change the slug to be whatever you want, that way your admin is harder for robots to find.
- We recommend keeping a password-protected list of all your websites and their WP admin slugs, so you always know where to go.
- Once you log in, you’re brought to the WP Admin “dashboard.” This is a hub of different tools and content for you to update a website.
Dashboard Sidebar Elements

Updates
This is the area of your website where you can make sure you are using the latest versions of WordPress, your theme, and your plugins. These updates are necessary to keep your website running smoothly and securely. We recommend checking for updates on a weekly or bi-weekly basis. Here’s how to perform these updates:
- If there are plugins that need to be updated, evaluate whether they are compatible with your version of WP or not. You should only update a plugin if it says it’s 100% compatible.
Ex. – Do NOT update:
Ex. – Good to update:
- If there is a WordPress or theme update and you have access to the hosting platform to perform a backup, do a backup before updating the theme.
- We recommend purchasing a hosting package that automates daily backups of your website, such as Flywheel.
- After everything is updated, check the WP admin for at least one page to make sure everything is functioning as expected on the “back-end.”
- Then double-check the front end of the site—look at the homepage and a few other internal pages. Does everything still look and function the same as before?
- If there are any problems after performing these updates, revert back to a backup of the site, and evaluate the best next steps with a web development team member.
Posts
The “Posts” area is where you can edit or add any new blog/news posts to your site. The term “blog” came from “weBsite LOG”—these are ongoing, frequent additions to the overall content of a website. Blog posts often have a slightly more simplified layout than regular web pages.
Pages
The “Pages” area is where you can edit or add any new pages to your site. Pages are more “permanent” parts of a website. Typically, pages are anything that appears in the main navigation menu of a website.
Media
Media is where you will find your website’s library of images, PDFs, and any other file type that is incorporated into your site.
Appearance
Among other things, this section allows you to customize your site’s theme, styles, most importantly, the navigation menu. Here are some simple steps to updating a WordPress menu:
- Click on “Menus” under Appearance.
- Make sure the correct menu is selected in the dropdown at the top of the page.
- To change the order, just drag-and-drop a menu item up or down. Then, click “Save Menu.”
- To add an item, in the “Add Menu Items” left sidebar, check the box for a page or post you want to add, then click “Add to Menu.” It will add it to the bottom, so just drag-and-drop it into the order where you want it to show. Then click “Save Menu.”
Users
This is where Admin users are managed. Anyone can add a user to a WordPress site. There are different “roles” that can be assigned — you can learn more about these here. *Quick tip: a common best practice when creating a user is to make the person’s username their email address.
Tools
Various behind-the-scenes tasks can be done in the “tools” area. This can sometimes get a little technical. However, one area Graphcom tries to make sure everyone is comfortable with is adding redirects. A redirect is similar to a postal forwarding address. It tells the browser “if someone tries to visit this address, send them to this other one instead.”
If a redirect is not in place, and a user tries to access a broken link or a page that doesn’t exist anymore, they get taken to a 404 page. We all know what this looks like. A 404 page is like a “return to sender” because either no one ever lived at that address or a forwarding address was never set up when the person (page) moved. To create a redirect, all you need to do is enter the “source” URL and the “target” URL.
To get a redirection tool in your WP Admin, you will need to install a plugin. Our team prefers to use Redirection by John Godley.
WordPress Page/Post Overview
Okay, you’ve identified the page or post you need to edit/create. Here’s how to get started!*
*Quick tip: if you ever don’t know whether the item you’re trying to edit is a page or a post, simply log into the wp-admin, go to the page, and use the black admin bar at the top to click “edit.”
Below are the common elements of every page/post:
- Title: This is used to identify the page/post within the WordPress Pages/Posts admin section, but also likely used in the top section of the front end of your page (also known as the “hero”).
- Permalink: This is also sometimes called a “slug.” This is the text that trails after the domain. A domain + a permalink = a URL. For example, the permalink for this article is /beginners-guide-wordpress
- Right sidebar: This is where you’ll find an abundance of different options for your page. The biggest ones you will regularly need to focus on are:
- Publish: Choose whether the item should be published now or later; should it be public or private? This is also where you can revert the page back to a previous revision if needed.
- Categories: Adding categories is important for filtering areas with large amounts of content, such as blogs! For example, this blog article is listed under our website with the following categories: WordPress, Web Design, and Digital Marketing.
- Tags: Adding tags can also be helpful for user experience with websites that have blogs. These are basically “keywords” that users might want to search/filter for. For example, here are some of the tags we used for this blog article: CMS, content management, theme, website.
- Featured Image: This is especially important for “grid” areas, where you show thumbnail images of pages/posts. This is the thumbnail image that will appear to entice your reader to click.
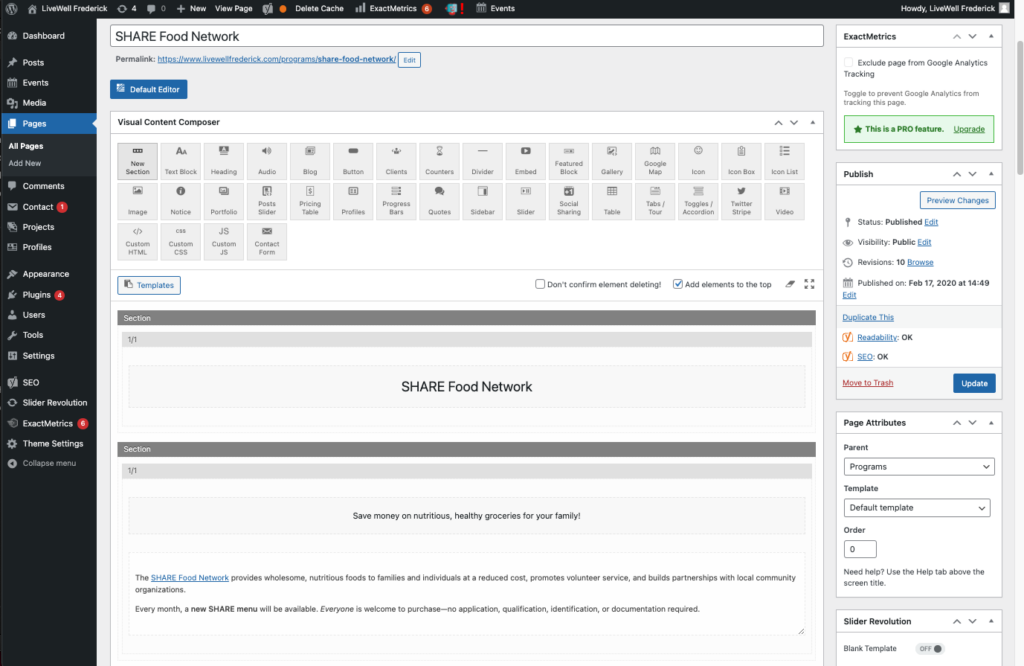
- Main content: The display that you see in the main content area will vary based on the theme. Most of the time, there will be some kind of block editor, like what you see below.
- *SEO: In most situations, web designers/developers will install a plugin that will add SEO settings and additional options to your website. This is to make sure that your website is properly optimized to appear on search engine result pages, like Google. Graphcom prefers to use Yoast SEO for these purposes. We highly recommend adding & activating an SEO plugin and making sure that you update the settings for every page/post that you create on your site.
Creating/Editing Pages and Posts
Pages
Pages are areas of a website that are intended to always stay available, fit thematically within the sitemap/navigation, and typically don’t involve comment sections.
- Creating a Page
- In the WordPress left-hand sidebar, under Pages, click on “Add New”
- Add a title for the page
- Adjust the permalink of the page, if needed
- Add the content for the page (more details on this below!)
- Assign a parent page, if needed
- Assign a featured image if needed
- Add in the SEO info (keyphrase, meta title, meta description, schema.org info, etc.)
- Assign a social image (via Yoast) if needed (this is the image that appears on Facebook, Instagram, LinkedIn, Teams, etc. when you paste a hyperlink)
- In the right-side Publish box, adjust settings as necessary. You can save it as a draft, choose for the post to be published at a later date, or publish it immediately. You can also publish but add a custom password for the page (by clicking “visibility”).
- Editing a Page
- In the WordPress left-hand sidebar, click on “All Pages”
- Click on the title of whatever page you want to edit
- *Alternatively, if you are logged into the admin already, you can simply navigate to the page on the front end of the website, and in the black bar at the top of the screen you can click “edit”
- Edit any of the content and then click “Update” to publish your changes to the page
- See more about editing content below!
Posts
Posts are what you think of when you think of a blog post. It’s an essay or article that was “published” on a certain day or time, and on many sites, the CMS would allow visitors to comment on the post as a way to facilitate conversation related to the subject matter. Posts could be considered “conversation starters.”
- Creating a Post
- In the WordPress left-hand sidebar, under Posts, click on “Add New”
- Add a title for the post
- Adjust the permalink of the post, if needed
- Add the content for the post (more details on this below!)
- Assign any relevant categories or tags
- Assign a featured image, if needed
- Scroll down and update any Yoast SEO settings as needed (keyphrase, meta title, meta description, schema.org info, etc.)
- You can also publish but add a custom password for the page (by clicking “visibility”).
- *If needed, you may need to go back to the “All Posts” section to edit the author of the post. The author will automatically default to your WordPress username—some clients need the author to be edited to someone within their organization (this info is usually included in the Word doc for the post).
- Editing a Post
- In the WordPress left-hand sidebar, under Posts, click on “All Posts”
- Click on the title of whatever post you want to edit
- Edit any of the content (title, text, tags, etc) and then click “Update” to publish your changes to the post
- See more about editing content below!
WYSIWYG (What You See is What You Get)
This is a standard visual editor that allows you to format text and add basic elements such as headers, lists, links, horizontal lines, images, etc.

Visual Mode
If you ever open up an editor and you don’t see the WYSIWYG editor bar, you’re probably in the “text” view. Simply click on the tab that says “Visual.”

Editing/Adding Content in the Editor
Updating/Adding Internal Page Content
- Once you’ve selected the element/module you want to edit, simply make your text edits straight into the body text editor, title field, button field, or other content fields in the admin module.
- Whenever you are adding content to a page, you should be adding appropriate heading tags to subheads in the text. Simply bolding the text is not enough— headings give the content more “weight” in SEO, so this is important for the website’s success (in addition to aesthetics/visual hierarchy).
Adding Hyperlinks to Page Content
- To create a link to another page or resource, highlight the text that you want to link, and click on the “Insert/Edit Link” button.
- Enter the URL where you want that text to link or select the page you want to link to via the options listed in the insert link window.
- If the link is external (meaning, it has a different domain name, it’s a different website) then you need to click the “gear” icon and check the box to “Open link in a new tab.” We recommend doing this for PDFs as well.
- Click “Update” or the button with the blue arrow, and then save the page.
Adding a Link to a PDF
- Upload the PDF to your Media Library.
- From the Media Library, copy the URL.
- Go to the page and find the text that you want to link to the PDF.
- Highlight it and click on “Insert/Edit Link” just like a hyperlink.
- Paste the URL you just copied, and make sure to click the gear icon and check the box to “Open link in a new tab”— PDFs should always open in new tabs.
- Click “Update” and then save the page.
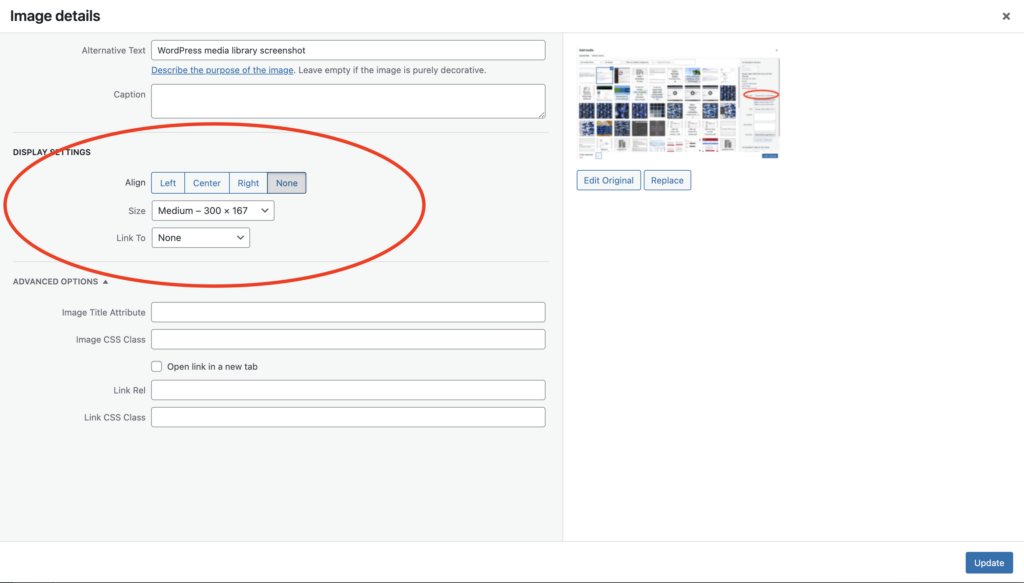
Adding Media (like images)
- Place your cursor wherever you want to put the image on the page
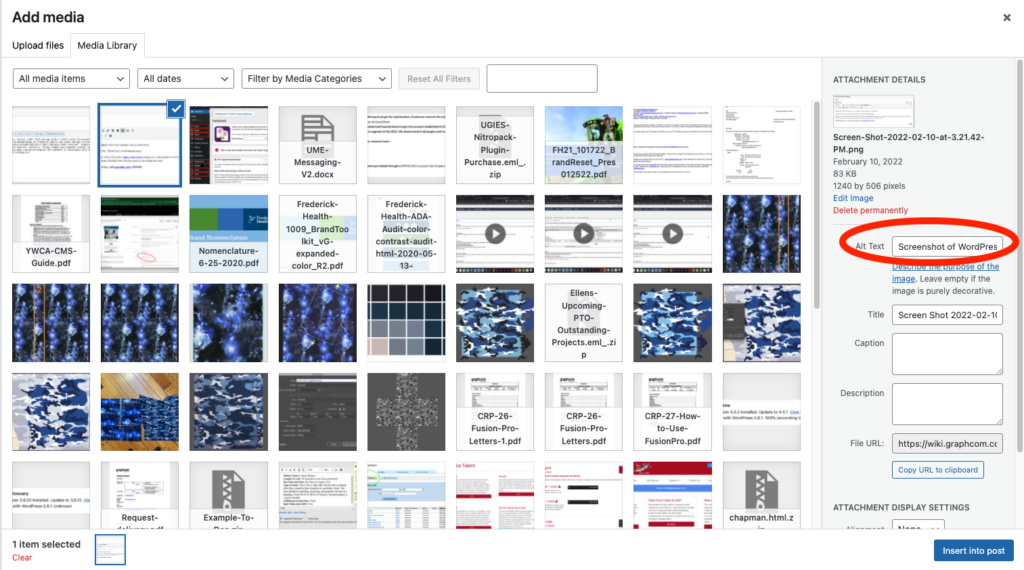
- Click “Add Media”
- Upload your image or select it from the existing library
- Double-check to ensure that alt text has been added to the image
- You may also need to click on the image, and click on the pencil icon to change settings such as the size and alignment
Applying Your New WordPress Knowledge
There’s so much in the world of WordPress, but thanks to its intuitiveness, you can get far with basic knowledge. Arm yourself with this guide next time you’re updating or creating a site in WordPress, and you’ll feel like an expert in no time.
If you’re not looking to take on your next web projects alone, no sweat. Graphcom would love to be your partner! Contact us for expert web development, web design, and more.
Need Help Getting Started with Your WordPress Website ?
Whether you’re starting from scratch or looking to revamp an existing structure, Graphcom is here to help.